
| 일 | 월 | 화 | 수 | 목 | 금 | 토 |
|---|---|---|---|---|---|---|
| 1 | 2 | 3 | 4 | |||
| 5 | 6 | 7 | 8 | 9 | 10 | 11 |
| 12 | 13 | 14 | 15 | 16 | 17 | 18 |
| 19 | 20 | 21 | 22 | 23 | 24 | 25 |
| 26 | 27 | 28 | 29 | 30 | 31 |
- 비동기 처리
- restore scroll position
- redux saga
- ESLint
- 실행 컨텍스트
- Babel
- useRef
- 무한 스크롤
- NextJS
- Spa
- graphql
- 식별자 결정
- Webpack
- SSR
- nvm
- 스코프체이닝
- 변수 섀도잉
- 세션스토리지
- 타입스크립트
- Architecture
- SAGA 패턴
- 환경 레코드
- Apollo Server
- task-definition
- Typescript
- Next.js
- scrollTo 안됨
- CSR
- Apollo Client
- 마이크로 프론트엔드
- Today
- Total
minguri brain is busy
Micro Frontends 번역글 2/5 요약 본문
이 글에서는 Cam Jackson의 Micro Frontends 번역 글을 보고 내가 쉽게 보려고 요점만 정리해봤다.
통합 접근 방식
느슨한 정의를 감안할 때 마이크로 프론트엔드라고 부를 수 있는 많은 접근 방식이 있다. 일반적으로 애플리케이션의 각 페이지에 대한 마이크로 프론트엔드가 있고 컨테이너 애플리케이션이 있다.
렌더링 구성
- 헤더나 푸터 같은 일반적인 페이지 요소 렌더링한다.
- 인증이나 네비게이션같은 교차적 문제를 해결한다.
- 여러 마이크로 프론트엔드를 페이지로 가져오고 각 마이크로 프론트엔드에게 언제 어디서 렌더링 할지 알려준다.
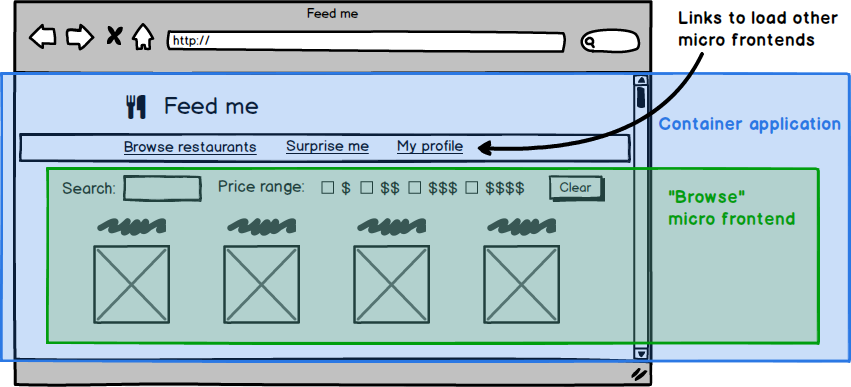
방법 1. 서버사이드 템플릿 구성
방식
여러 템플릿 또는 프래그먼트에서 서버의 HTML을 렌더링 한다. 페이지의 공통 요소를 포함하고 있는 index.html이 있고, 서버사이드 include를 통해 각 부분의 HTML 파일을 페이지의 특정 부분에 삽입한다.
<html lang="en" dir="ltr">
  <head>
    <meta charset="utf-8">
    <title>Feed me</title>
  </head>
  <body>
    <h1>🍽 Feed me</h1>
    <!--# include file="$PAGE.html" -->
  </body>
</html>
요청될 URL을 $PAGE변수에 매칭하여 설정을 구성한다.
server {
    listen 8080;
    server_name localhost;
    root /usr/share/nginx/html;
    index index.html;
    ssi on;
    # Redirect / to /browse
    rewrite ^/$ http://localhost:8080/browse redirect;
    # Decide which HTML fragment to insert based on the URL
    location /browse {
      set $PAGE 'browse';
    }
    location /order {
      set $PAGE 'order';
    }
    location /profile {
      set $PAGE 'profile'
    }
    # All locations should render through index.html
    error_page 404 /index.html;
}
이는 상당히 보편적인 서버사이드 구성이지만 이것을 마이크로 프론트엔드라고 부를 수 있는 이유는, 각 부분을 독립적인 팀에서 제공할 수 있는 자체 도메인 개념을 나타내는 방식으로 코드를 분할했기 때문이다.
각 마이크로 프론트엔드를 렌더링하고 서빙하는 분리된 서버 구성하고, 맨 앞단에 한 서버를 두어 다른 서버들에게 요청을 하게 할 수 있다. 캐싱을 잘 적용하면 지연시간 없이 수행할 수 있다.
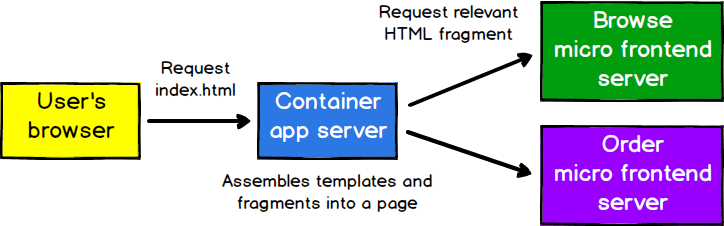
이런 각 서버는 독립적으로 구축 및 배포할 수 있다.
방법 2. 빌드 타임 통합
방식
각 마이크로 프론트엔드 어플리케이션을 패키지로 배포하고 컨테이너 어플리케이션에 모두를 라이브러리 dependency로 포함 시키는 방법이다.
{
  "name": "@feed-me/container",
  "version": "1.0.0",
  "description": "A food delivery web app",
  "dependencies": {
    "@feed-me/browse-restaurants": "^1.2.3",
    "@feed-me/order-food": "^4.5.6",
    "@feed-me/user-profile": "^7.8.9"
  }
}
장점
- 공통 dependencies의 중복을 제거할 수 있다.
단점
- 프로덕트의 개별 부분에 대한 변경사항을 릴리즈하기 위해 모든 마이크로 프론트엔드를 다시 컴파일하고 릴리즈해야 함
따라서 빌드타임이 아닌 런타임에 어플리케이션을 통합할 수 있는 방법을 찾아야 한다.
방법 3. iframe을 통한 런타임 통합
<html>
  <head>
    <title>Feed me!</title>
  </head>
  <body>
    <h1>Welcome to Feed me!</h1>
    <iframe id="micro-frontend-container"></iframe>
    <script type="text/javascript">
      const microFrontendsByRoute = {
        '/': 'https://browse.example.com/index.html',
        '/order-food': 'https://order.example.com/index.html',
        '/user-profile': 'https://profile.example.com/index.html',
      };
      const iframe = document.getElementById('micro-frontend-container');
      iframe.src = microFrontendsByRoute[window.location.pathname];
    </script>
  </body>
</html>
장점
- iframe을 사용하면 독립적인 하위 페이지에서 페이지를 쉽게 구축할 수 있다.
- 스타일링과 전역 변수가 서로 간섭하지 않는 훌륭한 격리 수준을 제공해서 어플리케이션 분할에 용이하다.
단점
- 유연성이 떨어지는 경향이 있다.
- 어플리케이션의 서로 다른 부분을 통합하기가 어렵기 때문에 routing, history, deep-link가 더 복잡해지고, 페이지가 완벽하게 응답하도록 해야하는 추가적인 과제가 주어진다.
방법 4. JavaScript를 통한 런타임 통합
방식
각 마이크로 프론트엔드 어플리케이션은 <script>태그를 사용하여 페이지에 삽입되고, 로드 시 전역함수를 시작점으로 사용한다. 컨테이너 앱은 어떤 마이크로앱이 마운트되어야 하는지 결정하고 마이크로앱에게 언제, 어디에서 렌더링 해야할지를 알려주는 관련 함수를 호출한다.
<html>
  <head>
    <title>Feed me!</title>
  </head>
  <body>
    <h1>Welcome to Feed me!</h1>
<!-- These scripts don't render anything immediately -->
    <!-- Instead they attach entry-point functions to `window` -->
    <script src="https://browse.example.com/bundle.js"></script>
    <script src="https://order.example.com/bundle.js"></script>
    <script src="https://profile.example.com/bundle.js"></script>
<div id="micro-frontend-root"></div>
<script type="text/javascript">
      // These global functions are attached to window by the above scripts
      const microFrontendsByRoute = {
        '/': window.renderBrowseRestaurants,
        '/order-food': window.renderOrderFood,
        '/user-profile': window.renderUserProfile,
      };
      const renderFunction = microFrontendsByRoute[window.location.pathname];
// Having determined the entry-point function, we now call it,
      // giving it the ID of the element where it should render itself
      renderFunction('micro-frontend-root');
    </script>
  </body>
</html>
장점
- 빌드 타임 통합과 달리 각
bundle.js파일을 독립적으로 배포할 수 있다. - iframe과 달리 마이크로 프론트엔드 앱 간 통합을 완벽하고 유연하게 처리할 수 있음
- 코드를 여러가지 방법으로 확장 가능
이러한 유연성과 독립적 배치 가능함으로 현실에서 가장 많이 사용하는 선택이다.
전체 예제 보기
방법 5. 웹 컴포넌트를 통한 런타임 통합
방식
이전 방법과 한가지 달라진 점은 마이크로 프론트엔드 어플리케이션이 컨테이너가 호출할 전역 함수를 정의하는 대신, 컨테이너가 인스턴스화 할 HTML 커스텀 엘리먼트를 정의하는 것이다.
<html>
  <head>
    <title>Feed me!</title>
  </head>
  <body>
    <h1>Welcome to Feed me!</h1>
<!-- These scripts don't render anything immediately -->
    <!-- Instead they each define a custom element type -->
    <script src="https://browse.example.com/bundle.js"></script>
    <script src="https://order.example.com/bundle.js"></script>
    <script src="https://profile.example.com/bundle.js"></script>
<div id="micro-frontend-root"></div>
<script type="text/javascript">
      // These element types are defined by the above scripts
      const webComponentsByRoute = {
        '/': 'micro-frontend-browse-restaurants',
        '/order-food': 'micro-frontend-order-food',
        '/user-profile': 'micro-frontend-user-profile',
      };
      const webComponentType = webComponentsByRoute[window.location.pathname];
// Having determined the right web component custom element type,
      // we now create an instance of it and attach it to the document
      const root = document.getElementById('micro-frontend-root');
      const webComponent = document.createElement(webComponentType);
      root.appendChild(webComponent);
    </script>
  </body>
</html>
결과도 이전 예제와 유사하다. 가장 큰 차이점은 ‘the web component way’를 행하고 있다는 것이다. 웹 컴포넌트의 스팩이 마음에 들고 브라우저가 제공하는 기능을 사용하는 것이 좋다면 이 방법이 좋다.
컨테이너 앱과 마이크로 프론트엔드 앱 간에 고유한 인터페이스를 정의하려는 경우에는, 이전 예제를 선호할 수 있다.
참고:
https://martinfowler.com/articles/micro-frontends.html
https://medium.com/@juyeon.kate/micro-frontends-%EB%B2%88%EC%97%AD%EA%B8%80-1-5-29c80baf5df
'Others > Architecture' 카테고리의 다른 글
| Feature-Sliced Design(FSD)를 NextJS와 함께 사용해보기 (0) | 2024.02.26 |
|---|---|
| Micro Frontends 번역글 3/5 요약 (1) | 2022.07.21 |
| Micro Frontends 번역글 1/5 요약 (0) | 2022.07.20 |


